How to Hang an Art Gallery
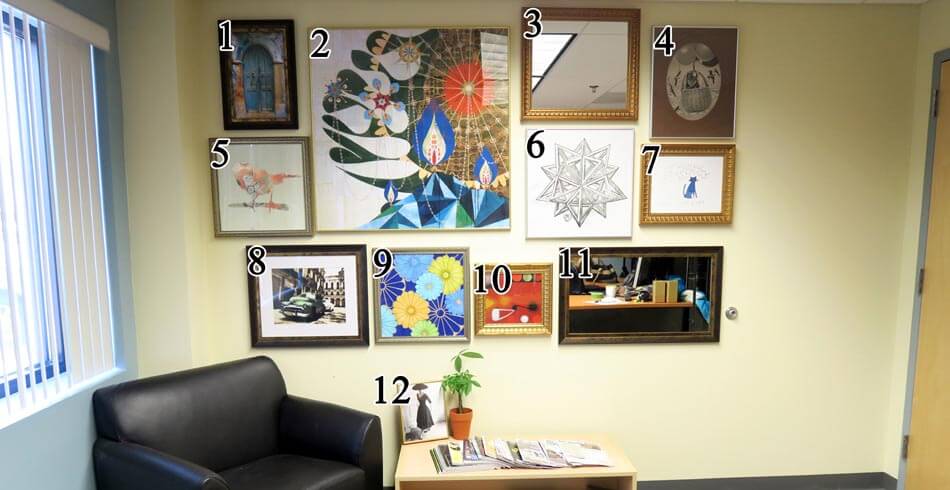
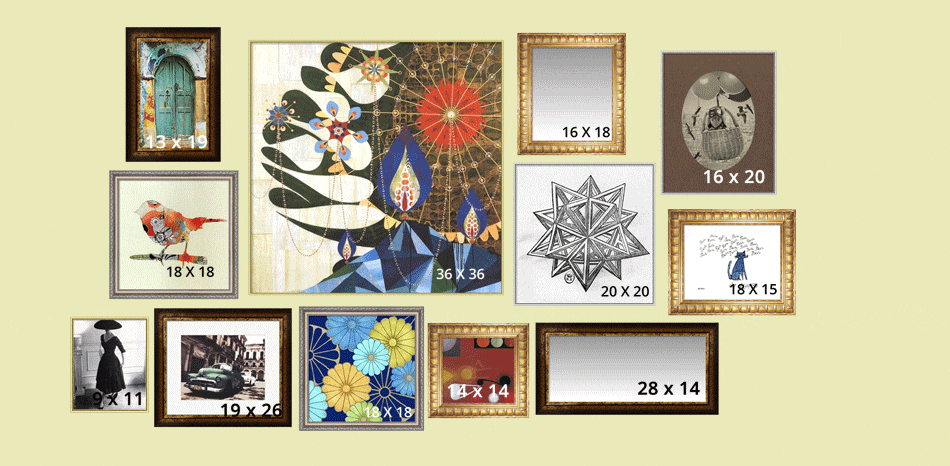
1. Arched Doorway by George Meis / 2. Parmotrema by Rex Ray / 3. Framed Mirror / 4. Mice Series #2 by J Hovenstine Studios / 5. Little Bird by Iveta Abolina / 6. Dodecahedron by Leonardo Da Vinci / 7. So Happy, ca.1958 by Andy Warhol / 8. Cuban Cars II by C.J. Groth / 9. Floral Confetti IV by June Erica Vess / 10. Small Red Seed #10 by Bill Mead / 11. Framed Mirror / 12. Dressed In Black by Sir Edward Hulton and Getty Images
Hanging a gallery is a great and diverse way to add color and life to your decor. If your wall is large and blank and you want something more than a simple framed art piece, this is the perfect way to upgrade your decor! The best part about hanging a gallery is you can show off your own personal style. Whether you want to mix different subjects and art styles, or keep one specific theme; hanging a gallery is all about your personal style and what you like!
Needed to Hang a Gallery
1. framed art
2. hammer
3. large scrap paper
4. level
5. nails
6. painters tape
7. screw driver
8. screws
9. scissors
10. writing utensil
STEP 1 - Get Inspired
The first thing you want to do before you purchase or begin thinking about your layout is to find some inspiration. Are you looking to do a grid layout or a more random, eclectic layout?
If you're looking for a unified look, a grid layout with artwork of the same size, shape and finishing can have a stunning effect. If this uniform look suits your style and space, try looking for a series of artwork or art by the same artist.
If you're looking for a more eclectic, playful design, choose a variety of different pieces with various frames and styles. Instead of uniting your artwork by an artist or particular frame, you can pull everything together by arranging them in an interesting fashion.
HINT: Try to choose some artwork and/or frames that are the same to add some balance to your gallery.
STEP 2 - Lay Out Your Artwork
On the floor in front of the wall you want to hang the gallery on, lay out where you want to hang all of your different art, mirrors and other wall accessories. It's best to start by deciding where you want your largest centerpiece and then building out your layout from there. This can be tricky and you definitely want to get it right the first time (no one wants unnecessary holes in their wall!). So try out a few different layouts before trying to hang anything.
HINT: Use your phone to take photos of your different lay out attempts. Then you can try a few different layouts and view them all before making a final decision.
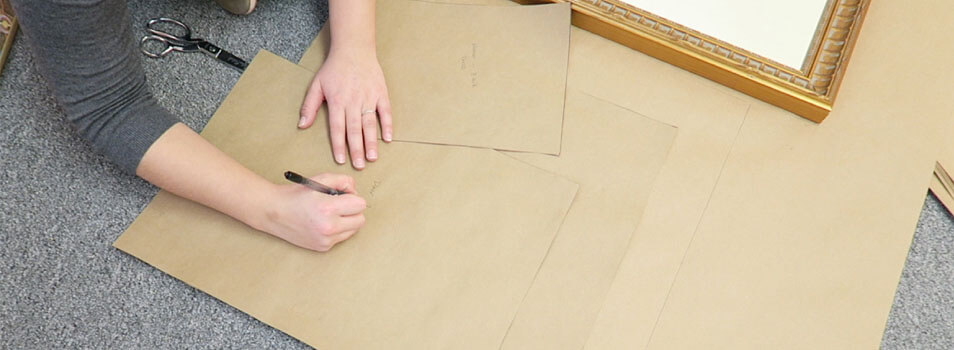
STEP 3 - Create Your Hanging Guides
Trace each framed art/mirror onto a piece of craft or tissue paper and cut each one out. You'll now have a perfect rectangle cutout that's the exact size and shape of each individual pieces of art you want to hang.
HINT: Write on the back of each cutout what the image is so you know which cutout goes with which framed piece.
STEP 4 - Mock Up Your Layout
Using painter's tape, hang each piece up on the wall according to your design. This step allows you to vertically align your artwork and make sure that you place them exactly where you want them. This will also give you a visual sample of what your gallery will look like completely done!!
HINT: Not in love with what it looks like? Simply remove your cutouts from the wall and try a different layout!
STEP 5 - Get Ready to Hang
The backing your frame will come with depends on the thickness and weight of the frame. The first backing it could come with is metal plate. One metal plate (or two depending on the size) will come already attached to the frame. You will need to screw the extra(s) into the wall with the flat part flesh against the wall and the elevated part up and out. For more information on how to hang this type of frame, click here! The second type of backing is a wire hanger. These frames can simply be hung by one (some may need two depending on the size and weight) nail.
To get the most accurate position, place the extra bracket into the bracket that is attached to the frame. Then measure from the top of the frame to where the bottom screw will go. You can also measure the length of the bracket to ensure the piece will be centered. For the wire backing, pull the wire up from the center until it is tight and measure from that point to the top of the frame.
STEP 6 - ENJOY!
Your gallery is official! The last step in this process is to take selfies in front of it, create Facebook albums of it and share it all over social media! Your gallery is now up on your wall for you to show all of your friends your hard work!
Check out these images from behind the scenes: